

8.11.2011
Car Seat Stroller
This is the best thing ever. You strap your heavy, awkward car seat to this thing and VOILA! It's a car seat stroller! This is a must have for any mom/toddler duo making their way through an airport. You can get this on Amazon or check out the links at the top right of the page!


8.10.2011
Knot & Bow - Etsy Love
This is one of my favorite shops on Etsy. Simple, and elegant items that you can use for almost anything. Here a my top three picks from this shop right now: (1) fabric ribbon, (2) mini pins & (3) mini gift tags.


If you like the look and feel of the items in this shop, you'll also love Olive Manna. Check out some of their cute items here:


If you like the look and feel of the items in this shop, you'll also love Olive Manna. Check out some of their cute items here:
8.09.2011
Birthday Party Time!
So I've already started planning for little miss Lily's THIRD birthday party (I can't believe that!). I've chosen to do a pink and yellow lemonade stand party. I got this inspiration from Wild Sorbet & UCreate.
 You can find a tutorial on how to create this awesome stand at Ucreate. Ucreate is a fun blog that's full of fun stuff to look at and do :) Check it out.
Now all I have to do is decide how I elaborate on this theme and turn it into a cool kids party!
Here's what I've got so far - My friend over at MommyLovesPretty had a tie dye party this weekend and I made these cool ombre favor bags. MLP has some other pictures and info on tie-dying.
Here's an idea I have for the cake too from Call Me Cupcake:


Now all I have to do is decide how I elaborate on this theme and turn it into a cool kids party!
Here's what I've got so far - My friend over at MommyLovesPretty had a tie dye party this weekend and I made these cool ombre favor bags. MLP has some other pictures and info on tie-dying.
 |
| Photo courtesy www.melissaolsonphotography.com |
 |
| Photo courtesy www.melissaolsonphotography.com |
Here's an idea I have for the cake too from Call Me Cupcake:

8.08.2011

8.07.2011
Maps
I get A LOT of questions on how I make maps and what info is needed. So, here's what I need from you to make it happen (and I'll show what it looks like when I'm done too!):
Step 1: Go to www.maps.google.com.
Step 2: Click on the "CREATE NEW MAP" button. You have to have a google account to save your places. This is easy, it won't create another account you have to keep track of, you just link it to your current email address.


Step 6: Repeat until you have entered all of you desired locations. Check out how all the locations are now saved on the left of the screen and I've zoomed out to frame all the locations.

Step 7: Now here's where you need to make a decision. Center and zoom your map to where the N, S, E & W borders of the map include all the land marks you'd like. If you've done this and you're not seeing enough details in a certain area, then I would recommend a detailed inset. Which is what we're going to do here for the location on the far right. It's in a downtown area that has lots of streets and might be easily missed. Here's what the inset is going to look like:


Step 1: Go to www.maps.google.com.
Step 2: Click on the "CREATE NEW MAP" button. You have to have a google account to save your places. This is easy, it won't create another account you have to keep track of, you just link it to your current email address.

Step 3: On the next screen you can give your map a title, description and set it as public or private.
Step 4: Enter your first address at the top of the screen and press the blue button to the right. The map will immediately update to the address you've entered.

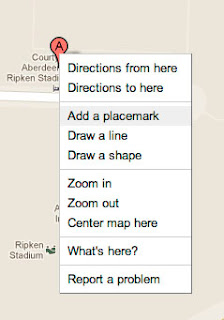
Step 5: Right click, and select add a Placemark. Label the location and select OK. Now you will see your first location in entered in your map on the left hand side of the screen.


Step 7: Now here's where you need to make a decision. Center and zoom your map to where the N, S, E & W borders of the map include all the land marks you'd like. If you've done this and you're not seeing enough details in a certain area, then I would recommend a detailed inset. Which is what we're going to do here for the location on the far right. It's in a downtown area that has lots of streets and might be easily missed. Here's what the inset is going to look like:

I'll include this major street in yellow on the large map and the inset for reference. The inset will be placed in a region of the map where there isn't a lot of detail.
Step 8: You save these images as jpegs. On a PC: just press the print screen key (it's on the upper right hand side of the keyboard). On a MAC: press command + shift + 3. the image will automatically save to your desktop as a jpeg.
Step 9: Send me the images and addresses via convo on etsy :) Also, don't forget to send me size information, colors and fonts!

Step 10: I draw your map! I'll post the map tomorrow morning :)
8.06.2011
Happy Saturday!!!
 |
| NausicaDistribution |
 |
| PopChartLab |
Today, we are celebrating my husbands 31st birthday! And in honor of him, I'd like to highlight some manly video game & nerd related gifts from Etsy! Happy Birthday!!!!
 |
| GeekThings |
8.05.2011
FREE Printable Pinwheel


Here's your Free Friday Download! :) Here are the simple instructions:
1. Print on regular printer paper.
2. Cut along dotted lines around the outside and the diagonals
3. Punch a whole in all 5 circles.
4. Fold in the sides with the punched circle.
5. Secure through the center of the pinwheel and a straw with a brad.
6. You're done!
For durability, you can try laminating the pinwheel before you put it all together or using strips of shipping tape if you don't have laminating material. Have your kids color these in or make them fabulous and elegant for a whimsical touch to a wedding or party. Pinwheels are just fun!
Subscribe to:
Posts (Atom)
